Git-GitHub-GitHubClassroom
Introduction: Git and GitHub
- Git is a free and open source distributed version control system.
- Git is used to tracking changes in the source code and enabling multiple developers to work together.
- GitHub is an online software development platform. It’s used for storing, tracking, and collaborating on software projects.
- In January 2022, GitHub hosted over 100 million repositories on its platform.
- More than 65 million developers actively use GitHub to collaborate on open source and private projects.
Basic Concepts

1. Installing Git
First, we need to install Git: the version control software.
- Git: Install git
2. Configuring Git Account
Open a terminal on your Windows or Mac and then write the following commands:

3. Initialize a Local Repository
- First, let’s start by creating a folder for our project. For this you can use the GUI of Windows or Mac, use a terminal or your preferred IDE.
- Next, cd into your project folder:
cd project_name - Finally, we need to initialize the repository using the following command:
git init

4. Staging & Tracking Files
4.1. Adding files to the staging area
4.1.1. Create a file named index.html containing a simple <h1> tag </br> 4.1.2. Git does not know about the file index.html. We can check the tracked files using the following command:
git status
4.1.3. The git status command allows you to know the status of the project: If it is initiated, modified, staged

4.1.4. For Git to recognize this file, we need to add it to the staging area and create a commit.
There are multiple ways to add files to the staging area.
- Add a single file
git add filename - Add multiple files
git add filename1 filename2 - Add multiple files and folders at once. Make sure to add a space between the add and the dot.
git add .

4.1.5. To remove a file from the staging area, we need to use the following command:
git rm --cached filename
4.2. Commits
A commit allows us to create a snapshot of the project state at that point of time. To create a commit, we use the following command with -m stands for message and we list the message associated with this commit.
git commit -m 'your message'
The message should be short and accurately describes the changes made. A clear message would allow us to identify a specific commit and eventually roll back to that state if needed.

To list all commits in The Local Repository
git log
To list only latest 3 commits
git log -p -2
To go back to a specific commi
git checkout commitID
Commit types
Commit Types
| Commit Type | Title | Description | Emoji |
|---|---|---|---|
feat |
Features | A new feature | ✨ |
fix |
Bug Fixes | A bug fix | 🐛 |
docs |
Documentation | Documentation-only changes | 📚 |
style |
Styles | Changes that do not affect the meaning of the code (white space, formatting, missing semicolons, etc.) | 💎 |
refactor |
Code Refactoring | A code change that neither fixes a bug nor adds a feature | 📦 |
perf |
Performance Improvements | A code change that improves performance | 🚀 |
test |
Tests | Adding missing tests or correcting existing tests | 🚨 |
build |
Builds | Changes that affect the build system or external dependencies (e.g., gulp, broccoli, npm) | 🛠 |
ci |
Continuous Integration | Changes to CI configuration files and scripts (e.g., Travis, CircleCI, BrowserStack, SauceLabs) | ⚙️ |
chore |
Chores | Other changes that do not modify source or test files | ♻️ |
revert |
Reverts | Reverts a previous commit | 🔄 |
5. Remote
First, we need to create an account GitHub.
- GitHub: gitHub
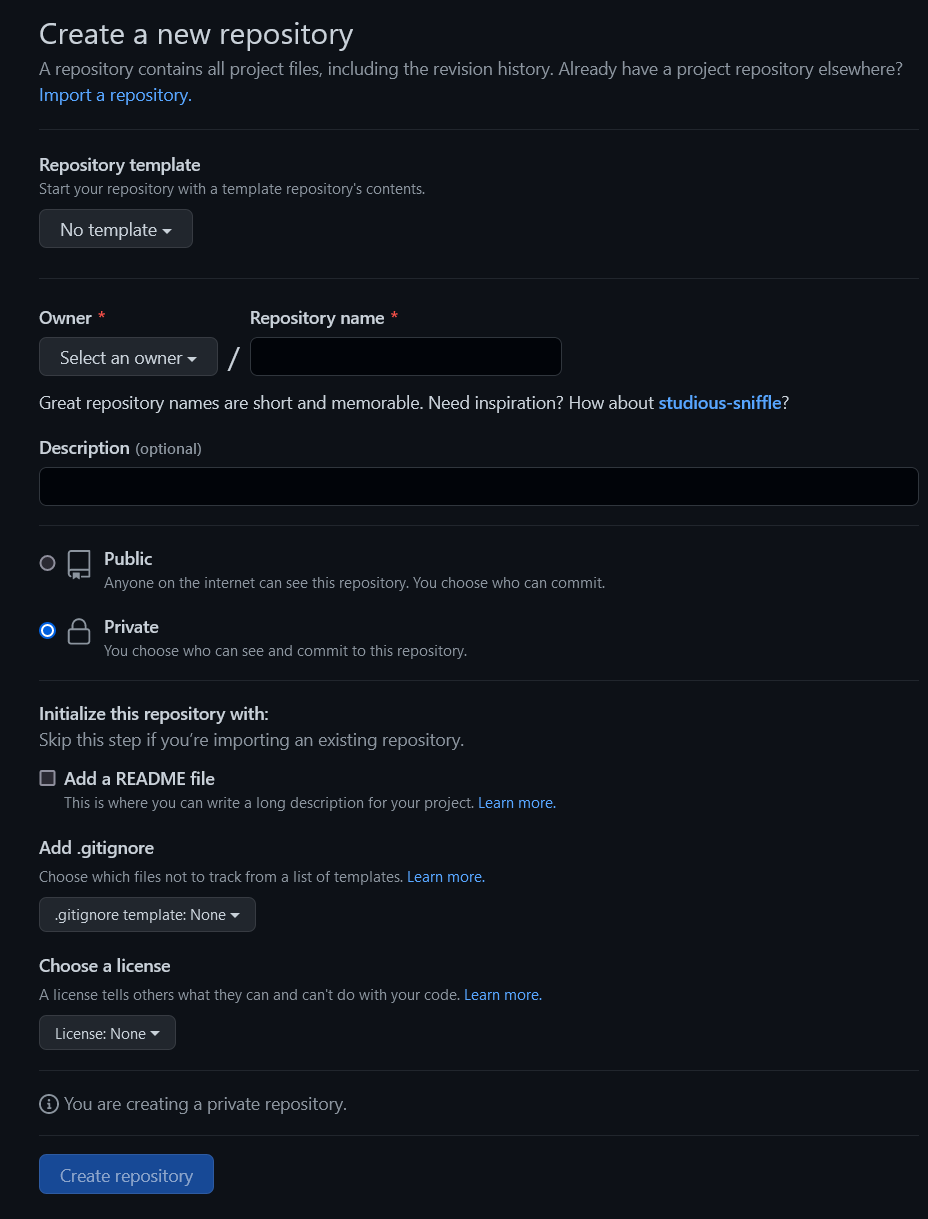
5.1. Create a Repository
5.2. Add a new remote to a local repository
git remote add origin https://github.com/user/repo.git
5.3. Push to a remote repository: The git push command is used to upload local repository content to a remote repository
For the first push, we need to use this commend:
git push --set-upstream origin master
- –set-upstream: The git set-upstream allows you to set the default remote branch for your current local branch
- origin master: The default branch
OR
git push -u origin master
5.4. Pull to a local repository: The git pull command si used to fetch and download content from a remote repository and immediately update the local repository to match that content
git pull
5.5 Copy an existing remote repository onto your local machine
git clone URL_OF_REPO
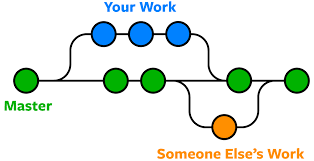
6. Branches
The branch is the copy of the main(or master) at branching instant. After branching, the branch and the master don’t see each other. You can create as many branches as you want.
6.1 Add a new Branch
git branch branch_name
6.2 Switch to another branch
git checkout branch_name
6.3 Create and checkout to the branch at the same time
git checkout -b branch_name
6.4 Merge a branch to the current branch
git merge branch_name
6.5 List of branches
git branch
6.6 Rename Branch
To rename any existing branch
git branch -m <old-name> <new-name>
To rename the current branch
git branch -m <new-name>
6.7 Delete Branch
The branch must be fully merged in its upstream branch.
git branch -d branch_name
OR Use the flag -D to force the branch delete.
git branch -D branch_name
7. What is a Fork?
A fork is a personal copy of someone else’s repository, created under your own account.
Forks are mainly used when you do not have write access to the original repository.
They allow you to freely experiment, make changes, and propose improvements without affecting the original project.
When you fork a repository:
- A full copy of the project is created in your account
- You can commit and push changes independently
- You can later propose your changes via a Pull Request
You should use a fork in the following situations:
-
Contributing to open-source projects
(You are not a member of the original team) -
Working on repositories you don’t own
(No direct push permissions) -
Submitting assignments via GitHub Classroom
(Each student works on their own forked repository)
Forks are a safe and standard way to collaborate without risking the stability of the original project.
🆚 Fork vs Branch (Summary)
| Feature | Branch | Fork |
|---|---|---|
| Location | Same repository | New repository |
| Permissions | Requires write access | No write access needed |
| Use case | Team collaboration | External contributions |
| Ownership | Shared | Personal copy |
- Use branches when you are part of the same team and have access
- Use forks when contributing from outside the repository
What is a Pull Request?
A Pull Request (PR) is a way to propose changes to a repository and ask the project owner (or teacher) to review and merge those changes.
Instead of directly modifying the main branch, you submit your work for review.
👉 A Pull Request means:
“Here are my changes. Please review them and decide if they can be added.”
Why Use Pull Requests?
Pull Requests are important because they:
- Enable code review
- Allow feedback and discussion
- Prevent breaking the main project
- Encourage safe collaboration
- Track who changed what and why
They are commonly used in:
- Team projects
- Open-source contributions
- Professional software development
- GitHub Classroom assignments
How Does a Pull Request Work?
A typical Pull Request workflow:
- Create a branch or fork
- Make your changes
- Commit your work
- Push changes to GitHub
- Open a Pull Request
- A reviewer checks your work
- Changes are approved and merged (or feedback is given)
Basic Pull Request Workflow
Create a new branch
git checkout -b feature/my-changes
Commit your changes
git add .
git commit -m "Describe your changes clearly"
Push the branch
git push origin feature/my-changes
Open the Pull Request
- Go to the repository on GitHub
- Click Compare & pull request
- Add a clear title and description
- Click Create pull request
What Happens After Opening a Pull Request?
The reviewer can:
- Approve the Pull Request ✅
- Request changes 💬
- Reject the Pull Request ❌
If changes are requested, you can update your code and push new commits to the same branch.
🆚 Pull Request vs Direct Push
| Action | When to use |
|---|---|
| Direct push | You own the repository and work alone |
| Pull Request | Team work, forks, classroom submissions |
Pull Requests are safer and more professional.
📚 Academic References
-
Git SCM. Git Official Documentation.
https://git-scm.com/docs -
GitHub. GitHub Documentation.
https://docs.github.com -
Learn Git Branching. Interactive Git learning platform.
https://learngitbranching.js.org -
GitHub Education. Git Cheat Sheet.
https://education.github.com/git-cheat-sheet-education.pdf
This educational content is licensed under the
Creative Commons Attribution–ShareAlike 4.0 International License (CC BY-SA 4.0).
![]()